Sunday, 19 July 2015

40K is Epic!

Hey guys and gals, and welcome to my humble blog once more.

On and off from here on I will be contributing articles to the gaming blog 'Creative Twilight', as well as posting here, and to make sure you done miss out on those articles, I'll be linking to them from my Eternal Wargamer blog page. Topics like my Sprue Cutters Union posts will continue to appear in their entirety here, but it is nice to be able to do something collaborative alongside other gamers.

So here we are with my first post as a contributor: 40K is Epic!

I hope you enjoy it, and thanks for reading...

Wednesday, 15 July 2015

Sprue Cutters Union - Must Stash!

Well, well, well. Welcome back finally to...the Sprue Cutters Union!

After something of a roller coaster ride of a half year or so, the Sprue Cutters Union is back and hopefully better than ever. I will certainly be doing my utmost to post on every topic, as I have always thought that this is a great venture, and one that I am proud to be a part of.

The new format will be that each Sprue Cutter will post up their views on the topic of the month as usual, but now they will be gathered together at the end of each month and made available via the Combat Workshop Facebook Page. No more listing of links to other blog posts at the bottom of the page. And to go with a fresh new start to the Union, how about a cool new logo?!


So, without further ado, this month's post is something of a remake of the classic Sprue Cutters Union topic...Must Stash!


Why do we accumulate a stash of unbuilt and 'potentially-never-will-be-built' kits?


OK then, we may have a new logo and a new Facebook outlet for our blogs thanks to Jon over at the Combat Workshop, but some things will never change: I will always being tackling the topic of the month from a wargaming perspective. Well, that isn't entirely true, some things change, because first time around of discussing this subject, my stash consisted of a single 'Solar Powered Construction Kit', which has nothing whatsoever to do with my hobby.

What happened?!


Imperial Guard Valkyrie, Dark Eldar Talos, Ork Fighter Bomber,
Dark Eldar Void Raven and assorted Hasslefree Miniatures
in little bags - and this doesn't include my Age of Sigmar starter set
or beautiful Axe-Faction miniature my beloved wife bought for me!


Alright, since you ask, I'll tell you what happened. Really, two things happened. The first, like many of us I am sure, and a contributing factor to the absence of the Union this year, is that work went crazy. Or should I say 'more crazy', because work for me has been a challenge for about a year now. I guess that's what happens when you are in it at the pointy end, with a hundred emails a day flying at you and nowhere to run.

The other occurrence was that I made a certain 'hobby resolution' at the onset of 2015, which you may or may not recall was to finish off to a 'tabletop' standard two hundred and fifty gaming miniatures by the twelfth chime of Big Ben on December 31st 2015. 

Now then, this painting promise resulted in a flying start to the year, and up to this point I have just upped my total for 2015 to 160 miniatures done and ready to fight. Given that during the whole of 2014 I managed around a third of that number, I think that I have done rather well. The target is twenty per calendar month, and I aim to be averaging twenty five per month come the end of July. I am really aiming for the big Three Hundred by the end of the year if I can.

The unfortunate side effect of all this painting is that it is eating up the vast majority of my hobby time, and as the 'big things' like vehicles are a comparatively minor part of my collection (only about twenty or so tanks), with the vast bulk being made up of various hundreds of infantry and cavalry models, the armour and flyers have found themselves at the bottom of the 'to do' list. Opening stash means 'cutting sprues', filing and scraping components, and assembly, none of which involves a paint brush, and if I plan to hit my targets for the year, the acrylic has to flow like Income Tax out of my wages.

So there we have it. In the previous iteration of this post, I had said that as a gamer first and modeller/painter second, my focus would always be on assembly and game play and painting models would come in its own good time. Having seen just how many unpainted miniatures I own and committed to doing something about it, that focus has shifted considerably. In fact it's a wonder I have time to be typing this post. 

It's a good job really that I don't consider all my unpainted miniatures as stash, because it will take in the region of five years to get it all painted at a rate of 250-300 per year. All I need to do is avoid building up a collection of new models to add to the pile...Doh!!!


For the first time in what feels like an age, thanks for reading. 


P.S. I have signed up to write some gaming based articles for the Creative Twilight blog, and I will link those back to this page, so I invite you to keep a look out for some tabletop delving from me soon.

Saturday, 28 February 2015

Tutorial: Magnetising for beginners - Harpy/Hive Crone

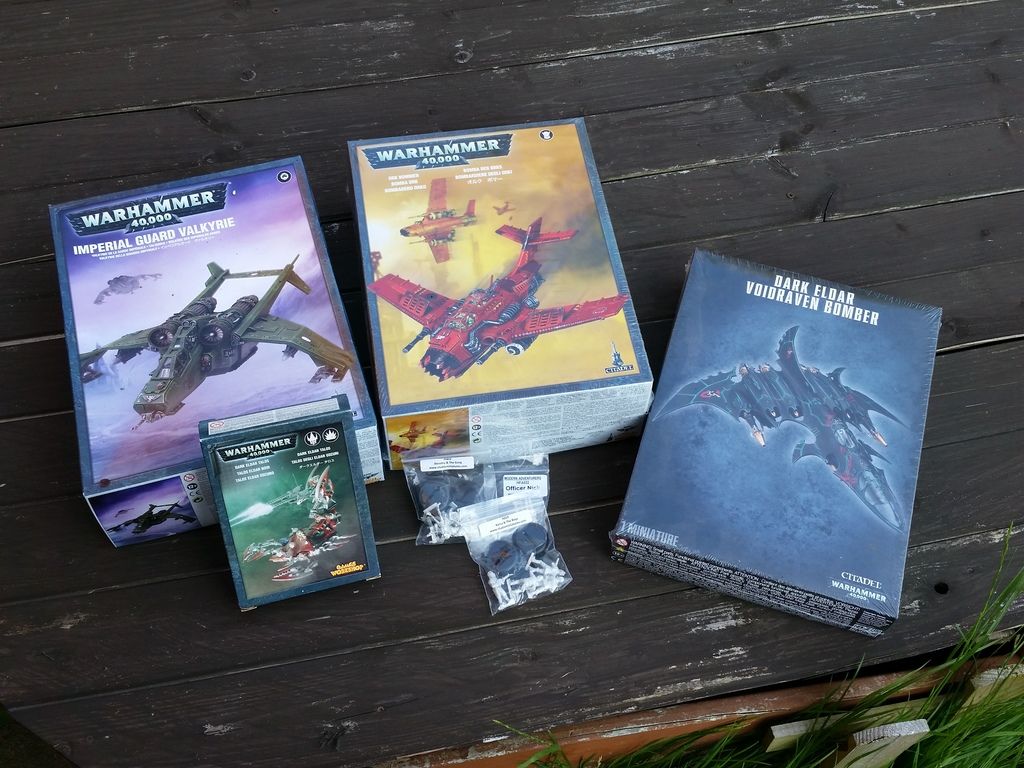
Greetings wargamers and hobbyists, welcome to the workbench. This is where I make furniture for the house, carry out minor DIY projects, and dissect bio-monstrosities...


This post is going to be something of a tutorial on how to use magnets to allow you to build a model kit in such a way that you can change pieces over between games to represent any of the kit options, rather than building the model as a single fixed model.

I shall state clearly from the outset that this is intended to be a guide for beginners that will help you get to grips with the tools and methods I use to complete a simple magnetising project, only magnetising the pieces you need to in order to get the kit flexibility you want, not an in depth or advanced tutorial to allow you magnetise every single part to the nth degree. I hope however that once you are comfortable with the concepts presented here, you will have the confidence to try more involved projects.

Also, before I begin, everything I show you here is what I do and the tools I use, having worked things out pretty much for myself. Other people may do things differently, and you should feel free to see what other people have done and cherry pick the best advice available and that suits you. Don't take my word as the only option out there.

So, if we all have our goggles on and brain in gear, I'll begin...

First things first:

CONCEPT

A quick question to start, just to make the mission statement clear: why do we want to magnetise a model kit?

Answer, simply, is to allow us to take bits off the model and exchange them for other bits, so that by the time we're done changing bits, the model either has different weapon options on show, or, like the Harpy/Crone kit, can represent a different unit entirely.

Now you don't have to magnetise a kit to be able to use it as another model, all you really have to do is make it clear to your opponent what the model represents before the game starts and use it as a stand-in. As long as your opponent doesn't have an issue with this, and the proxy isn't wildly inappropriate, this is perfectly fine, but of course if you can change bits over by magnetising the kit instead, why wouldn't you?

Thankfully some kits don't need magnetising to change stuff over. Take the Shadowsword kit for example. I can use the tank as any one of half a dozen variants just by changing out the barrel configuration of the main gun, and this can be done by just push fitting the different bits. The moral of this tale is 'don't make work for yourself'. If you don't need to magnetise something to be able to change it round, don't bother.

Lastly, there is another reason to want to magnetise a kit, and that is ease of storage and transport. Some models might be far easier to pack into a box and cart around, as well as taking up less 'volume' in a storage case if you can disassemble it before packing it away.

Next...

KIT PREPARATION

Before we can get into the meat of how to magnetise a kit, I need to say a word about the work you need to do on the model beforehand. This involves looking at the kit you are assembling, going through the stage by stage assembly guide, and picking out the point at which the basic structure of the model is complete, and the guide splits into two or more sections which explain how to complete the build depending on which option you have elected to construct.

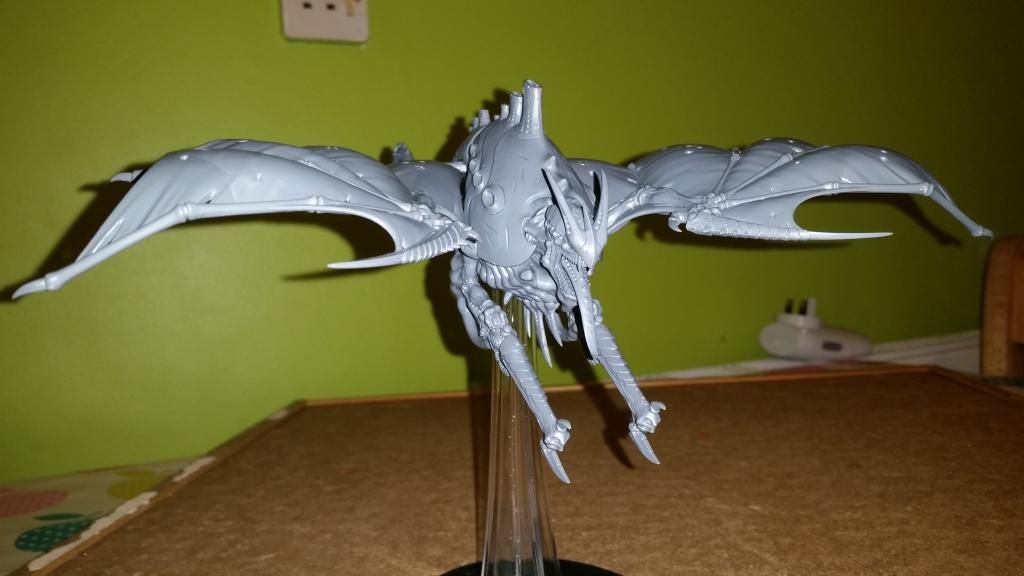
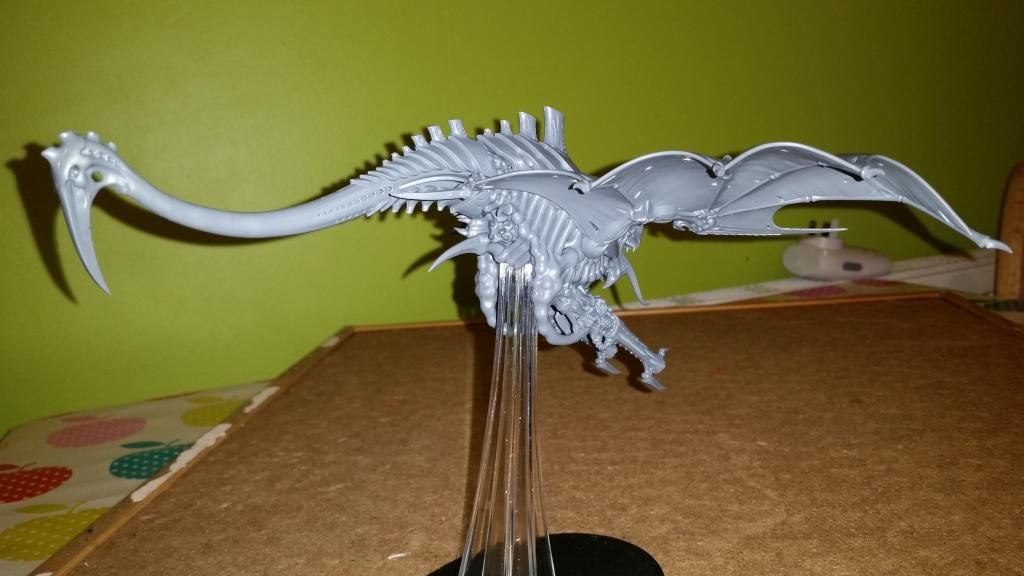
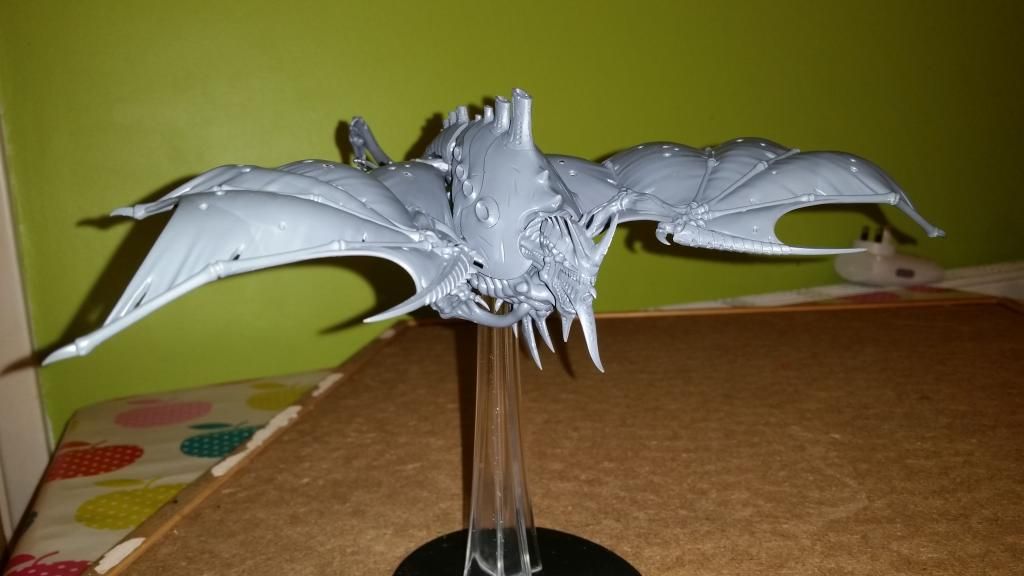
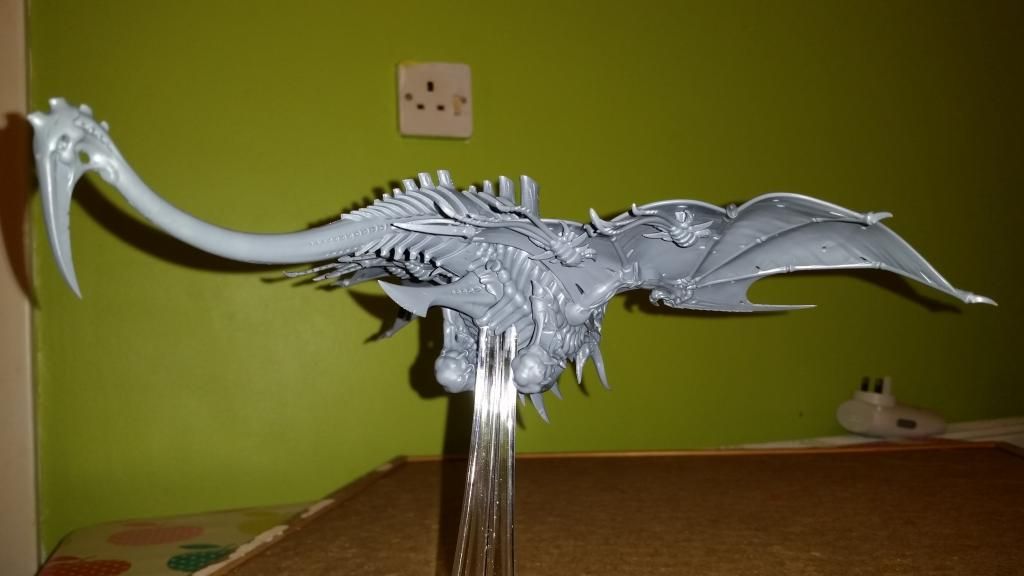
Below are photos of the Harpy/Crone kit assembled to the point where adding anything else takes the kit in one direction or the other. In other words, this is the point you get to where you have completed the assembly of the parts are common to all the options in the kit. The bits you are left with are specific to one build option or another.


Decisions, decisions...

Now I did say that this tutorial is meant to keep things as simple and straight forward as possible, and with that in mind, there may well be bits with some kits that are kind of discretionary when it comes to the need to magnetise them. These tend to be bits that are specific to just one kit option, but don't really affects the overall appearance of the model, and don't form any of the distinct list options, like weapons etc. 

Below are some photos of bits I decided to simply choose an option for and glue into place, rather than try and magnetise them. This really was for simplicity's sake. I could have gone all the way and magnetised these bits as well, but that would have taken extra time and also needed a different, additional size of magnet which I would need to purchase for something that doesn't give a huge amount of benefit in the long run. I've seen other tutorials for this kit that did magnetise these bits, and I applaud the dedication of those modellers, but for me, it just wasn't worth the effort.


From left to right, these are: rear talons, tail biomorph, chest bone blades. The reasons I decided to simply choose the bits I liked best and glue them on are as follows:

Rear talons - 

The joint on these is just way too small in my opinion to be able to fit magnets at all, they would have to be pinned, which needs wire and alternate drill bits etc. See my rule about not making work for yourself.

Tail biomorph -

This piece could actually be magnetised, but my preferred size of magnet is a little too deep, and the tail may not be able to accommodate it - I would need a shallower magnet. I decided however that it wasn't worth the bother, the expense or the wait to order a pack of smaller magnets just for this piece, so I just glued the tail option I liked into place.

Chest bone blades - 

This piece also could be magnetised if I really wanted to, but doing that with the magnets I already had would mean that when the piece wasn't in place, the magnets that hold it in place would be visible, which I wouldn't be happy with. This is because the alternate bits for the other kit option is a series of much smaller spikes, which fit in a different place on the chest. If you look closely you should be able to see that I decided to use both options: the blades, with a couple of the tiny spikes on either side.

So we've made some decisions about bits we are going to glue into place rather than bother to magnetise, and the result is that we have some bits we are not going to use. These are pictured below:


Here we can see the alternative tail piece, the alternative rear talons, the last of the tiny spikes that didn't get used, and the big blade-spikes that go on the top of the carapace. These last bits are the final discretionary assembly decision I made: In order to allow me to magnetise the carapace blades, I would have needed to create greenstuff beds to insert magnets into, which is possible but also time consuming, and as the ability to change these parts over doesn't affect the list options, I decided to take the easy option and glue into place the bits I preferred, pictured below, glued along the flanks of the carapace. 


I have done this before on the Nephilim, but those bits were weapon options, and it's not something I would recommend for your first project. I've included photos below so you can see the kind of thing I mean. It's one thing to drill into plastic and glue and magnet in place, and another to have to manufacture a bed to sit the magnets in because there isn't anything but a hole where the pieces go.


TOOLS

so, we've made a few discretionary decisions about what we're going to magnetise and what we aren't, and we've assembled the kit to the point where we're ready to start the magnetising part of the project. Here are the tools I typically use when working on a kit:


Nice and simple. a pin vice, drill bit, green stuff and of course, magnets. It's as as that really. The only other thing you need is super glue, which I assume you will most likely have access to.

Now I have already talked about the use of the green stuff when you need to create a floating bed for a magnet to sit in. I have seen some people use bits if plastic to create elaborate frames that they glue into place to support a magnet, but I thought 'hey, why bother with all the fiddling about. If you aren't going to see it anyway, why not just stuff some putty in the hole?' I like using this method because you can position the magnet while the putty is still soft to make sure you get the depth of the magnets right, which is an important part of the job, and it sticks like concrete when it's set. Like I said though, baby steps.

The most important thing to note about the tools however is this: I use magnets which are the same diameter as the drill bit I use to make the holes the magnets will sit in. On the first project I did, the drill bit I had was a little bigger, so I had to put green stuff  in every drill hole to make the magnet sit tight. For the second project I made sure I got myself a drill bit that matched the magnets, and the result was that I could drill the hole, push the magnet in, and in some cases the fit was so snug it didn't even need glue. This makes the whole process much easier and a bit quicker.

As for the magnets themselves, they are  neodymium or 'Rare-earth' magnets, and I buy them on ebay, typically in batches of 100. There are a huge variety of different sizes of these magnets, but the one I have settled on as being both small enough to be useful in magnetising most model components, but strong enough to the job, are cylindrical in shape, 2mm in diameter, and 2mm in depth:


Now before I say another word about these magnets,,,WARNING!


THESE ARE BLOODY POWERFUL MAGNETS, 
KEEP THEM THE HELL AWAY FROM ELECTRONIC DEVICES LIKE:
SMART PHONES, COMPUTERS, SMART TV'S, PACEMAKERS ETC.

THEY HAVE THE CAPABILITY TO BUGGER STUFF UP!


That bit is important. So when your packet of magnets arrives in the post, don't stuff it in your pocket alongside your expensive smart phone...

Now the only things you really need to know about the magnets apart from their ability to bring down a Titan by screwing up its main cogitator banks, is that, like most magnets I guess, they have two poles: a negative end, and positive end. This means that two magnets will attract if facing the right way round, and repel each other if one of them is the wrong way round.

The final warning that should come on the packaging of your magnets is that you should not file or try to cut the magnets, and you shouldn't need to do this anyway. 

THE BUILD

So, we have our tools and magnets, we've assembled all the common components of the multi-option kit, and we've perhaps made a few decisions about bits we are going to glue into place rather than try and magnetise, for the reasons discussed earlier. We are ready to start installing magnets.

Below are two photos. The bits on the left are the Harpy bits which have had magnets installed, and the bits on the right are for the Hive Crone.                                                                                                
                           

If you look closely, you can see the magnets installed in the various bits - they are the shiny metallic discs. The top pieces in each set of bits are the head and tail. below you can see the arms, and on the Crone photo you can see the Tentaclids. Each piece has a single magnet installed.

The installation of a magnet is as follows: Using your drill bit which is the same diameter as your magnets (in my case a 2mm bit for my 2mm magnets), you position the tip of the bit in the location you want the magnet to sit, and you start off very slowly to make sure the location of the hole doesn't drift. The reason for this is that the magnet in the bits above needs to match the location of the magnet on the main body of the model, otherwise the bits won't sit in the right position, either falling off altogether, or not sitting right because the magnets are misaligned and are pulling the piece to one side and out of place. 

It is important that you get this right, but it is just a case of taking your time. Once you have fitted your first few magnets, you'll be more comfortable.

Once you have your hole, it needs to be deep enough to allow the magnet to sit with the surface flush with the surface of the piece. It doesn't matter if you drill the hole too deep (unless that means it pushes right through and out of the other side of the piece, making it look like it took a hit from a Lascannon), because when you push the magnet into the hole, you will only push it until the surface sits flush, not deep into the hole. The idea is to position the magnets on each piece so that when the pieces are in place, the magnets sit in contact with each other and hold the pieces together.

In some cases the hole will be tight enough so that the magnet pushes in snugly and stays put. If the hole is not quite that tight, you will need to prime the hole with a dab of super glue to make sure the magnet stays where it is once it's in the hole. If you don't glue the magnet in when the hole isn't quite tight enough to hold it without, then when you fit the corresponding piece, the magnet in the other bit will pull the magnet back out of its hole, which of course is no good. Getting the holes, and therefore the magnets, in the right place is probably the single most important part of a magnetising project.

Now I'll show you where on the main model I positioned the corresponding magnets.

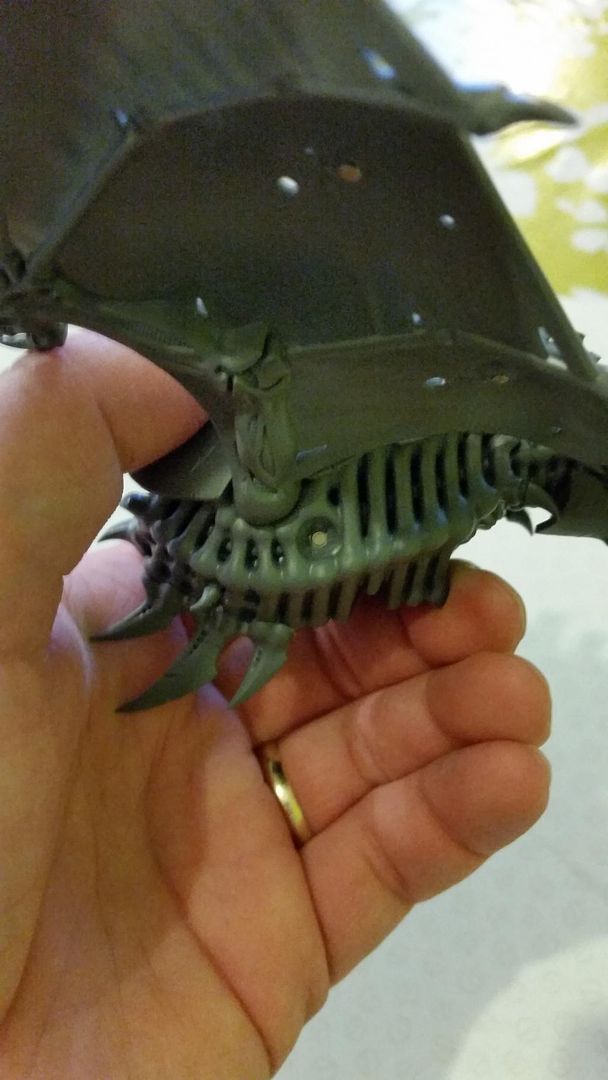
First, the head. This is where I put the magnet in the neck cavity:


You can clearly see the face of the magnet in the back of the cavity, and it sits flush with the surface of the plastic. Now when you are setting up magnets to make a part interchangeable, like the head for example, and the parts you are fitting the magnets don't give you obvious matching points, then you need to work out how to mark on the heads and the 'neck' where the magnets need to go so they line up correctly.

One way of doing this is to test fit the parts together to work out where you will have nice large contact points between the parts, before deciding where to position the magnets. There is no use in installing magnets in bits that don't meet. I worked on the idea that putting the one 'receiving' magnet in the main body of kit first would make sense, because that is the one that the magents in the two heads would need to match up to. I chose a spot in the back of the neck cavity I thought gave a good contact point, and I drilled a 2mm hole using the 2mm drill bit. Once this was done I added a touch of superglue to the hole, and pushed a magnet in until the top surface of the magnet finished up flush with the surface of the plastic of the neck cavity. If you have used a touch of superglue, then you can keep pushing until the magnet is in position, and when you stop, the glue will hold the magnet fast, so don't stop pushing till the magnet is flush.

Next comes marking where you need to drill the holes in the heads. To make sure that the magnets in the heads would both be positioned to align with the magnet in the neck cavity, I did this by putting a dab of paint on the magnet I had installed in the neck cavity, and then pushed one of the heads into the cavity. This left a spot of paint on the back of the head where it aligned with the magnet in the neck, giving me the spot I needed to drill the hole. I then of course repeated this with the other head.

Earlier I mentioned the poles of the magnets. Now is the time I had to make sure that once I had drilled the holes in the two heads, I installed the magnets the right way round so they would attract to the magnet in the neck, and not repel.

Now these magnets are very fiddly things, and the way I have worked out is the easiest for me to pick up a magnet, make sure it's the right way round, and then get it into its hole is as follows:


  • Let one of the magnets stick to the magnet you have already installed - in this case, the neck cavity. This ensures that the magnet is the right way around, and it holds the magnet in place, without needing to try and remove it from its position, which can be tricky while keeping it the right way round.
  • Put a dab of superglue in the hole that the magnet is going into - in this case in the back of the head.
  • Push the head down into the cavity so that the magnet goes into the hole, and keep pushing until the head is sitting fully into the cavity.
  • Wait a minute for the glue to fix the magnet in the hole.
  • Pull the head away from the neck cavity. 


If everything goes as it should, this should leave the magnet in the neck cavity in its hole, and the newly installed magnet in the back of the head in its hole, with both magnets the right way round and a snug fit of the parts. Now at this stage if you find that the magnet in the back of the head isn't quite flush with the surface of the plastic, either protruding a fraction or pushed in a little, don't worry, because if it's only a fraction and the two pieces were firmly pushed together, it doesn't matter. The main thing it that the magnets are firmly fixed in place, and that the two model parts fit snugly together.

Rinse and repeat with the other head. Once this stage is complete, you should now be able to put either of the two heads in place and it should stay in place, and you should be able to swap them over.

So now we have established the process for installing magnets, using dabs of paint to make sure that all the parts align together, and how to make sure the magnets go in the right way around, you simply repeat the process with the rest of the parts. 

The photos below show you where I installed the magnets on the rest of the kit:

First, the 'arm holes':
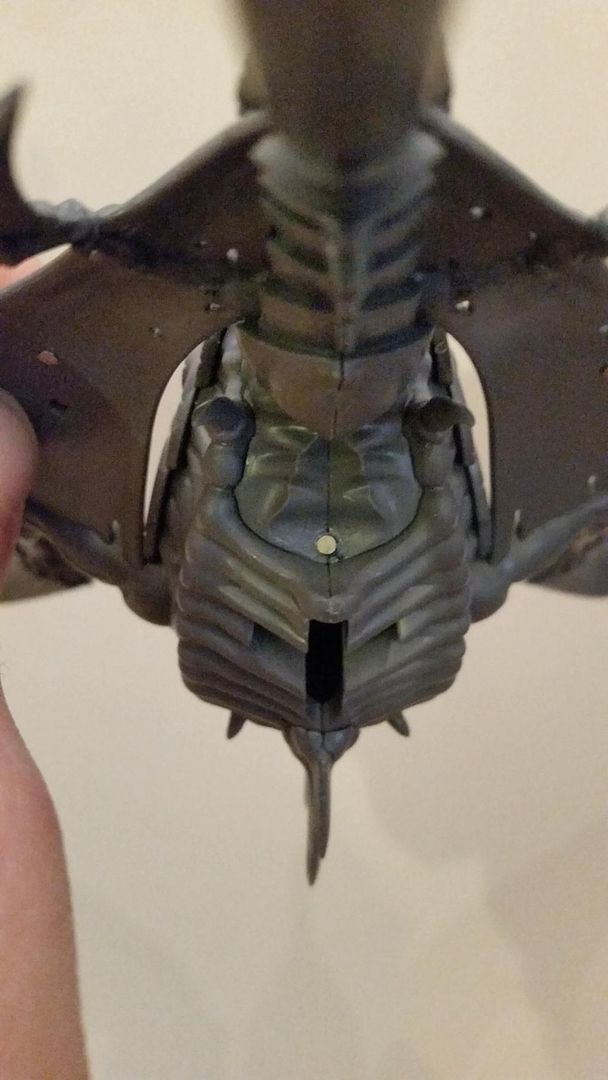

And the tail:


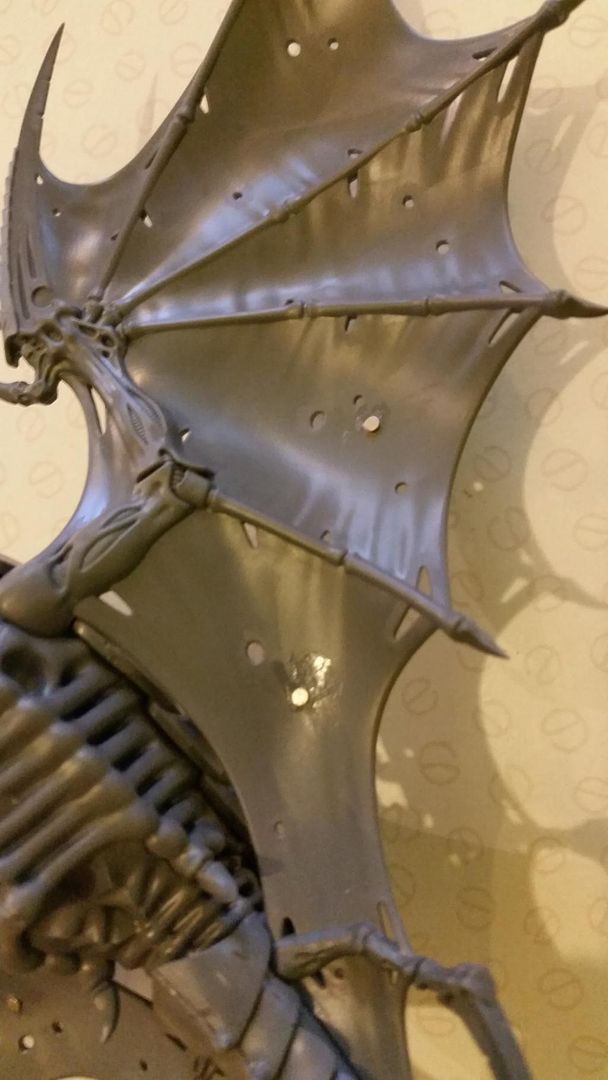
 And the wings - for the Tentaclids:


Now if you look at the photo that shows the Crone pieces earlier, you'll see that after much deliberation I decided to glue the Tentaclids to their 'mounting points' and then magnetise the whole thing to the underside of the wing. I did this for two reasons. First, magnetising the Tentaclids to the mounting points was not practical, and I preferred not to have the mounting points glued on the model when it was set up as the Harpy, because it would look like the Harpy had fired off a load of Tentaclids it didn't have in the first place.

I think it makes little difference to the model to remove the whole Tentaclid and its mounting point when it has been fired in game, because it's fitted under the wing. The main thing is being able to remove the Tentaclid, so that you can remove them as they are fired, and take them all off when switching to 'Harpy mode'. As luck would have it, the little holes in the back of the Tentaclid mounting points are exactly 2mm in diameter, so it was no brainer really as they came pre-drilled!

Here are the photos of the kit set up as the two options once all the magnets were in place. First, the Harpy:


And now the Crone:


 Just a couple of hints below:


  • Dry fit pieces before super gluing either pieces or magnets in place - it's not an easy thing to get a superglued magnet out a hole.


  • Avoid pushing a magnet through the hole you have drilled in a piece that has a closed cavity, like the head. Once inside, you won't get it out without cutting your model apart (so it pays to have plenty of magnets), and your model will make a nice rattling sound as it flies around the table.


  • One for the Harpy/Crone kit specifically - glue the tongue in place BEFORE you glue the two sides of the head together - it won't fit past the teeth afterwards!


I hope that this article is of use. Please feel free to ask questions or suggest any points I haven't covered which might be good to add in. I haven't gone through the fitting of every piece individually, because the principles are the same pretty much every time, and I hope the photos of all the pieces and their magnet positions will be enough, plus, the article would be three times longer.

Take your time with your first attempt. Once you have successfully installed your first couple and your brain has accepted the programming, it becomes much easier.


Good luck, and thanks for reading...


P.S. As of this morning, my painting total for this year stands at 66 painted infantry models out of a target of 40!


Saturday, 21 February 2015

Is This Hobby Dying?...Sprue Cutters Union #31

Greetings fellow wargamers and hobbyists, and welcome to my Ponderium, which of course is where I come to think on the labyrinthine intricacies of the universe. And to watch the Rugby.

Is This Hobby Dying?


This month, the Sprue Cutters Union members have been asked to give our thoughts on the idea of whether the hobby of scale modelling is a dying pass time. I as always intend to answer this question with my usual 'wargamers twist'.

I must of course approach the question of whether the hobby of scale modelling is on it's last legs from a wargamer's perspective, because a wargamer is what I am, rather than a pure scale modeller, and my first inclination is to ask you dear reader whether you are open to the idea that birds are really flying dinosaurs?

You may be forgiven for thinking that this is something of a strange question to ask, but bear with me. If you are open to the idea that birds are in fact dinosaurs in another, more survivable form, adapted to their environment where their great big thunderstomping ancestors were not, then I put it that the hobby of Scale Modelling is not dying, but perhaps it is transforming into something else, something both the same, and different...

Let me start by dissecting the question. In my view, to know whether we can say whether the hobby is dying or not, we must understand what the hobby is. Not what it may once have been, but what it is now.

I consider myself to be a wargamer, a painter, a collector, assembler and converter of miniatures, but does that make me a 'scale modeller'? If being a scale modeller means assembling and painting purpose built scale models with the singular aim of creating models for display, then no, I am not a Scale Modeller, but if we begin to consider the hobby of Scale Modelling in a wider sense, that of the assembly and painting of models of multitudinous forms, then the answer becomes a rip roaring yes! 

If we take the example of what seems to be the majority genre of scale model building, that of military vehicles primarily from the World War II period, and look at how they fit into my favourite hobby of miniature wargaming, we see straight away a huge variety of military vehicles, from bipedal walkers to motorbikes to aircraft and three hundred ton super heavy tanks. Fair enough, most of mine are of a futuristic bent rather than faithful representations of historical war machines - I mean, look at the Sisters of Battle Exorcist: a missile firing church organ on tracks! I ask you! - but does that really make any difference when determining whether they qualify?

Ok, so if you are of a mind to insist on historical real world examples of wargaming miniatures, then there are plenty of those as well. How about two increasingly popular World War II games, Flames of War and Bolt Action? And that's without mentioning the raft of game rules available to try out which require miniatures to play out battles on the tabletop? 

If there is one thing that being a tabletop wargamer in today's world of internet and social media, it's that there are more styles and preferences out there than I care to try and name, and certainly more than enough to cater for the tastes of even the most demanding gamer.

So, if we want to see scale models in all their glory, these days we can look not only to the domain of the true scale modeller, but also to the battlefields of tabletop wargamers, whatever our tastes for genre, time period or scale. Scale modelling isn't dying, it's evolving. There are more miniature manufacturers jumping on the wargaming miniatures bandwagon than ever before, and the kits are getting bigger and more intricate all the time.

Not only that, looking at even sci-fi games like Warhammer 40,000, there are campaign books and supplements coming out like the Imperial Armour books and the entire Horus Heresy 30K series, which are in effect 'historical' and open up the possibility of sticking faithfully to the unit markings, vehicle paint schemes and even wargear options of the campaign, just like the true scale modeller and their real world historical referencing.

Maybe it's time some of my true scale modeller buddies jumped the fence and gave miniature wargaming a try?


Thanks for reading...


If you enjoyed this post, or more likely would like to read more sensible view from other members of the Sprue Cutters Union, I recommend checking out the links below to their posts, and to the main topic hub over at the Combat Workshop.


Scale Model Workbench
Doog's Models
Mattblackgod's World
Kermit's Bench
The Combat Workshop

Topic Hub


Finally, if you would like to join a group of dedicated collectors, assemblers, and painters of models of all kinds, how about joining the Sprue Cutters Union? All you need is your own hobby blog, and a passion for this hobby. We post on a monthly basis on the topic of the moment issued by our glorious leader, Jon over at the Combat Workshop - look here for more details.


Sunday, 4 January 2015

Old Dog, New Tricks...Sprue Cutters Union #30

Howdy wargamers and hobbyists, welcome to 2015 and the return of the Sprue Cutters Union. It's been a few months since the Sprue Cutters last rode onto the field, but as I threatened at the end of last year...we're back!

I'd like to start by saying that I have certainly been looking forward to reinvigorating the Sprue Cutters Union posts, and its return is all the work of Jon over at The Combat Workshop, who does a sterling job of running the show and keeping us all inspired with blog topics, even around his own real life demands, so thank you Jon.


The Sprue Cutters Union posts will hence forth be a monthly emission, so on with this month's topic:


What New Products/Techniques Will You Purchase/Attempt This Year?


Well well well, what kind of things will I be trying out this of all years, when I have set myself the resolution of painting up a minimum of 250 models before the end of 2015? I think it would certainly make sense for most of my efforts this year to be in support of that painting goal, and in order to achieve that goal there is one thing I need to get much better at.

Quite simply, I need to paint faster.

So then, when you are a wargamer with hordes of infantry,  cavalry, monsters and vehicles to paint, what does painting fast entail? Well the first thing I have to talk about is the standard of painting I want to end up with.

Malorian said it pretty well in his recent YouTube video about speed painting: you can get a model painted in about five minutes flat if you stick to no more than three colours and don't bother with any of the details, and with practice you can end up with a model that looks like what it is meant to represent from the extreme limit of battle cannon range - 72", or six feet. I however have spent many years building up my painting skills to the point they are at now, which I consider to be nearing the top end of tabletop standard.

This means I think my painting is better than what someone might achieve if they just rush out models as quickly and simply as possible, but they fall short of competition standard. That's just my opinion though; everyone has to judge for themselves whether they are happy with the work they are producing. 

My hope is to maintain a standard that I would be not be embarrassed to field on the table, but quick enough to keep to my schedule of about twenty models per month. It may be the case that further down the line I come back and take the fine details and highlights to the next level, but initially I would like to get caught up on the huge backlog of unpainted miniatures I own.

So what do I already know about painting quickly? Well, I know how to batch paint, I'm just not all that fast at it. What I want to look at this year is how to speed up the process, so what I plan on doing is experimenting with different coloured undercoat/basecoat sprays.

Until now, I have almost always undercoated my models in either black or white spray, usually black. Now this is pretty much the norm. Long gone are the days of undercoating miniatures by hand with a brush. What I want to explore now is the concept of using sprays to base coat miniatures in their 'dominant colour', and then simply add some details afterwards to get a result I am happy with in a much shorter time. I want to veer away from spray undercoating black and then painting 70% of a model brown when I can just spray the model brown to begin with and take it from there.

Hopefully, if I use my Orks and Bretonnian peasants as an example, I can spray base coat them brown, then just paint the skin areas and weapons, give the various areas a wash to shade, finish the base and call it done. My Tyranids too: spray them blue, apply a quick drybrush highlight, a wash to shade - done. That's the plan anyway.

So what else can I do to speed things up? One thing I can certainly do is give more careful consideration to my colour selection when painting models. In the past I have quite happily spent time mixing colours to get just the shade I want for a model, but when I'm meant to be knocking out models quicker, that is just too time consuming to maintain. From here on in I plan to implement a strict policy of no mixing of colours, unless it's just for a single session of highlighting and that's it. No coming back to the painting table and spending valuable time re-mixing a shade I used last session. If it can't go on the shade it is straight from the pot, it doesn't get used.

Anything else? Well, the last thing I plan to do is less a technique and more a motivational tool. I need to make sure I maintain consistency because I am working to a schedule, and each month I miss the target of twenty models means that much more of a hard time I will have on the home stretch at the back end of the year to meet my goal. I plan to maintain the pace by running pretty much back to back painting challenges online, because they are a great way to ensure that I get at least some painting done pretty much every day. Little and often, that's the way I find gets results, without sapping my will to live.

To summarise then, new things I am going to do this year to help speed up my painting:

1. Buy and use coloured spray paints to base coat miniatures in their dominant colour wherever possible.

2. Avoid mixing colours to produce other shades, because it takes too long. Instead, use colours as they are out of the pot, and if I don't have a colour I really want to use - buy it!

3. Limit the number of levels of detail I go to while I bring my collection to a basic but respectable tabletop standard. I can always come back later on and spend more time on them at my leisure.

4. Don't drop the batton! Do whatever I need to to maintain the pace; paint a bit every day whenever possible, aim for twenty models per month, take part in painting challenges and change it up between armies and units to avoid getting bored of painting the same thing for too long.

There it is then, the new things I will be trying this year to accomplish another new thing and get a record number of miniatures painted before the end of the year.

Feel free to drop me a comment below to tell me about any new techniques or products you plan on trying out this year.


If you want some inspiration, you could do much worse than check out the links below to the blogs of other Sprue Cutters Union members, and to the Topic Hub over at The Combat Workshop where members will post their links after mine goes up.

Check these out:


And finally, if you yourself write any kind of miniature modelling blog, then perhaps you would like to consider joining the Union? All it takes is the dedication to produce one article per month on the topic of the moment, and include links to other members articles at the bottom of your own post as I have done. All you need to do is keep an eye on The Combat Workshop or any of the member blogs for details of the next topic! Look here for more details.


As always, thanks for reading.

Friday, 2 January 2015

Storm of Chaos vs End Times

Greetings fellow wargamers and hobbyists, and welcome to the twilight zone…noo-nee-noo-noo, noo-nee-noo-noo…

A very quick post today, touching on a subject that is big in the Games Workshop/Warhammer news at the moment – The End Times.

I am often inspired to type up a blog post by comments that I hear on the many podcasts I enjoy, and only this morning I was listening to The Dwellers Below discussing The End Times and differences between this and the old Storm of Chaos. They chatted about whether they thought the story being developed in the End Times would stick and officially change the setting of the Warhammer game, or whether it may all just disappear in a few months as if it had never been, just like the Storm of Chaos did.

The thoughts I have had since have been about what makes these two events fundamentally different, and therefore very difficult to compare fairly in a ‘like-for-like’ manner.


VS


Comparison no. 1

The Dwellers commented that the Storm of Chaos mainly existed online and in White Dwarf at the time of the event, whereas The End Times are fully supported by books. This may have been an ‘in-the-moment’ oversight by the Dwellers, who I typically find to be very knowledgeable, but the Storm of Chaos did have its own book, which detailed the build up to the events, new army lists and scenarios to be played. Without knowing more about what the guys meant, it’s hard to be definitive in my conclusion, but I think it’s possible that they may have meant that the Storm of Chaos was not supported by books as it progressed in the way that The End Times has.

Comparison no. 2

Game Rules. The End Times has introduced not only characters and rules for those characters to be used in game – which the Storm of Chaos also did – but much wider reaching additions and alterations to the main game rules, in particular the magic phase, and the degree to which armies have been combined to allow a vast variety of new unit and army combinations. This has allowed some lower tier armies to be combined with units from other force lists which either fill gaps in capability or boost the inherent strengths of the army, and has made some lesser used or underpowered armies far more playable.

Comparison no. 3

Plot arrangement. This aspect is what really clicked in my mind and made me want to address it in a blog post. A while back in one of my ‘Forging the Narrative’ series of posts, I raised the question of how you might arrange the narrative plot when organising a campaign – do you have the entire plot laid out in advance and allow the players to ‘play through’ the pre-determined story, or do you build up the story and then let the players take over from a certain point and determine the path of the conclusion for themselves based on their ‘in-game’ actions – wind it up and let it go?

This is in my opinion the single most profound difference between the Storm of Chaos (which was a worldwide campaign intended to be played to its conclusion by Warhammer Generals across the global community), and The End Times, which is in practice a set of source books which allow players to use rules in their own games set around the End Times events). This is also where the discussion ties back into my earlier Forging the Narrative post.

Games Workshop have seemingly decided to retain control (at least so far) of the plot development, rather than allowing the actions of the Warhammer community to dictate the development. When we compare this to the Storm of Chaos, this is quite possibly the reason that the Storm of Chaos went the way of the Dodo, because the way the story played out wasn’t what Games Workshop planned for or expected, and they had a hard time writing it out in a manner that players could believe and engage with. In other words, the well laid and well set up plan went somewhat awry, because the games that were played sent the campaign in rather a different direction.

I think that this was a good idea on the part of Games Workshop and their talented team of writers, and it’s also what has kept gamers hooked on the story as it has progressed, no matter how fantastical and unexpected the turn of events. With the number of well-known characters that have bitten the proverbial bullet as the story has gone on, and the way in which the relationships between races and nations has changed quite dramatically in some cases, the story so far is for me what I think GW would have wanted the Storm of Chaos to be if things had followed their grand plan, and then some.

Comparison no. 4

I would very much hope that people have already twigged this one, but I suppose that when I remember how many years it is since the Mild Breeze of Chaos blew out, it also reminds me how old I am.

The debate about The Storm of Chaos and The End Times needs to account for one rather significant piece of information, and this is something I mentioned as part of the last comparison:

The End Times is a vast and sprawling narrative with accompanying rules to allow gamers to play out battles using scenarios, special characters and rules all forming part of the release. In essence, although it is ongoing, it is a set of source books. It provides a setting and rules for playing out battles in the setting, or to actually re-fight key battled in the manner of a historical battle. The Storm of Chaos, in stark contrast, was a worldwide campaign, with all the associated implications – the story was built up, and then the gamers themselves were given the tools to go out and play out the action to a conclusion.

These are two very different formats and ways of running an event, particularly in the way the information is controlled by the ‘Games Master’ or Narrator (Games Workshop) and in the impact that the players are allowed to have on the development – in the case of The Storm of Chaos the impact of the players actions was huge (and relinquishing that control to the players is probably where things started to fall apart as far as the story was concerned), in The End Times the impact of the players actions doesn’t extend beyond depleting stocks of the wonderful books and models, and giving headaches to tournament organisers, for whom I have a degree of sympathy trying to deal with all the changes and uncertainty.

Anyway, before this quick post becomes a ramble, those are my brief thoughts about the differences between the two events. If you have any thoughts about the comparisons, or think I have either made too much of some points and not enough of others, feel free to drop me a line.


Thanks for reading…

Wednesday, 31 December 2014

Go on then, lets do some Hobby Resolutions!

Greetings fellow wargamers and hobbyists, and welcome to the cusp of a brave new year! It’s that time again, when we say farewell to the year that is ending, slam home a new powerpack, check our sights, and set the time circuits for 2015. Whatever you do…don’t look back.


It seems that year upon year we hobbyists and gamers make the same kind of wishful and occasionally wildly unachievable New Year’s resolutions that everyone else does, though we of course tend to make two sets of resolutions – the mundane kind, like ‘this year I will drink less’, or ‘this year I will lose weight’ – and then, hobby related, resolutions. For us, I think these are the ones that really matter.

While on the subject of hobby resolutions, I have to wonder whether this is something that is unique to Wargamers, or whether it is something that is undertaken across the whole spectrum of hobbyists, from the Scale Model crowd, to the X-Wing mob, the board gamers and even the card gamers? I’d like to find out a little more about this phenomenon.

So, I guess the point of this post (as I am sure it will be for every other hobbyist’s ‘Resolutions post’ you are likely to read), is to tell you all what kind of promise I plan to make for the coming year. Well I decided some months ago what my plan for the coming months (and years) would be, and I guess that this is a chance to make it official.

My New Year’s Hobby Resolution for 2015 is to paint a minimum of 250 models by the end of the year. I am not sure if this seems like a lot or not. It’s certainly enough models to make up one and a half to two armies, so I guess it is quite a few – given that many people make it their task to complete a single army within the current year.

When I break it down to ‘model count per month’, it only comes out at 20, which I think seems much more manageable – 5 each week every week. I plan to continue whenever possible to spend my one hour lunch break at work each day painting, and Thursday evenings for another hour or more while the wife is out at her class, so it’s perfectly achievable in my opinion, apart from the painting time I invariably lose when assembling new models! So the answer is seemingly to not purchase any more models. Or go on holiday – at least not without my painting kit.

In fact, I also need to consider the amount of time it would take to paint single large models as well, which might take 2 weeks on their own. I guess I need to refine my batch painting techniques so that when I am painting infantry models in bulk, I can whizz through them that much quicker. I already bought myself a can of Halfords ‘Rover Russet Brown’ to use to base coat my Bretonnian Peasants and my Orks, after getting on very well with the Halfords matt black primer. Best try a test model first though!

And why 250 for the year? Well, a couple of months ago I had a bit of a tot up of the approximate number of models I have in my Warhammer Fantasy and Warhammer 40,000 collections, and I determined that at a rate of 250 models per year I could have all of my Warhammer and 40K models painted by the time my son turns 8, which is an age at which I think he will be old enough to really start to understand the games to a degree that will allow us to properly start his ‘wargamer training’.

So, there is my hobby resolution for 2015 (and beyond), and my thinking behind it. I really intend push hard on this, and to keep up the momentum both by listening to gaming podcasts while I paint, and to change it up with every new unit I paint between the various armies I have, just to prevent me from getting bored painting all the models from a single army before moving on to the next army. This does however prevent me from taking part in any of the various ‘army painting challenges’ that people are running, because I’m not planning on spending enough time on any one army to complete it in the year – but you never know I guess.


I’d be interested to know what your hobby resolutions are, whatever kind of gaming you are into, so feel free to drop in a comment.

I wish you all a safe and prosperous New Year, full of hobby goodness. See you on the other side, and for the last time in 2014 - thanks for reading.